使用Hexo + NexT 快速搭建博客

本文最后更新于:2 年前

安装

安装 node.js

如果你已经安装了 node.js,请忽略。

访问node.js 官网,根据指引进行安装。

安装 Git

如果你已经安装了 Git,请忽略。

访问Git 官网,根据指引进行安装。

由于众所周知的原因,Windows 从上面的链接下载 git for windows 最好挂上一个代理,否则下载速度十分缓慢。也可以参考这个页面,收录了存储于百度云的下载地址。

安装 Hexo

  • 国内的朋友,因为众所周知的原因,从 npm 直接安装 hexo 会非常慢,所以你需要用到镜像源,参考上面的步骤,使用 cnpm 命令行工具代替默认的 npm: 在 windows 控制台(cmd)里输入并执行npm install -g cnpm --registry=https://registry.npm.taobao.org,然后安装 hexo: cnpm install -g hexo-cli

  • 国外的朋友,请直接打开 windows 控制台,输入npm install -g hexo-cli并执行。


建站

建立本地博客文件夹

在命令行执行如下命令,其中<folder>为文件夹路径

1
2
hexo init <folder>
cd <folder>

所有有关hexo的命令 均要在<folder>路径下执行。

建立好后文件夹目录如下

1
2
3
4
5
6
7
8
9
.
├── _config.yml
├── package.json
├── .gitignore
├── node_modules
├── scaffolds
├── source
| ├── _posts
└── themes

其中

  • _config.yml:站点的配置文件,可以在此配置大部分的参数。

  • package.json:应用程序的信息。EJS, Stylus 和 Markdown renderer 已默认安装,您可以自由移除。

    1
    2
    3
    4
    5
    6
    7
    8
    9
    10
    11
    12
    13
    14
    15
    16
    17
    18
    {
    "name": "hexo-site",
    "version": "0.0.0",
    "private": true,
    "hexo": {
    "version": "3.9.0"
    },
    "dependencies": {
    "version": "3.9.0"
    "hexo-generator-archive": "^0.1.5",
    "hexo-generator-category": "^0.1.3",
    "hexo-generator-index": "^0.2.1",
    "hexo-generator-tag": "^0.2.0",
    "hexo-renderer-ejs": "^0.3.1",
    "hexo-renderer-stylus": "^0.3.3",
    "hexo-renderer-marked": "^1.0.1",
    "hexo-server": "^0.3.3"
    }
  • scaffolds:模板文件夹,是指在新建的文章文件中默认填充的内容。例如,如果您修改scaffold/post.md中的Front-matter内容,那么每次新建一篇文章时都会包含这个修改。

  • source:资源文件夹,存放用户资源的地方。除_posts文件夹之外,开头命名为 _ (下划线)的文件/文件夹和隐藏的文件将会被忽略。Markdown 和 HTML 文件会被解析并放到 public 文件夹,而其他文件会被拷贝过去。

  • themes:主题文件夹。Hexo 会根据主题来生成静态页面。

  • node_modules:node.js 模块,一些 插件依赖 会被安装到这里。

更加详细的解释请参考hexo 官方文档

安装 NexT 主题

进入本地博客文件夹并将 NexT 主题clonethemes文件夹下

1
git clone https://github.com/theme-next/hexo-theme-next themes/next

你会看到,在next下也有一个_config.yml的文件,这是 NexT 主题的配置文件,为了区别它和 博客配置文件,下面会用带路径的文件名来描述它们:

  • <folder>/_config.yml:站点配置文件
  • next/_config.yml:主题配置文件

启用 NexT 主题

<folder>/_config.ymltheme:选项填next,=>theme: next,注意冒号后空一格。

到这里,建站的任务就完成了。你现在可以打开控制台,输入并执行如下命令:

1
hexo g

完成没有报错之后执行如下命令:

1
hexo s

其中

  • hexo g:新建public文件夹,并在其中生成网站静态文件(html,css,等文件)
  • hexo s:启动 hexo 服务器,默认情况下,访问网址为:http://localhost:4000/

更多有关 hexo 的命令,请参考hexo 官方文档命令部分。

你最后会看到控制台有如下输出:

1
INFO  Hexo is running at http://localhost:4000/. Press Ctrl+C to stop.

在浏览器地址栏输入http://localhost:4000/并访问,你应该会看到如下页面:
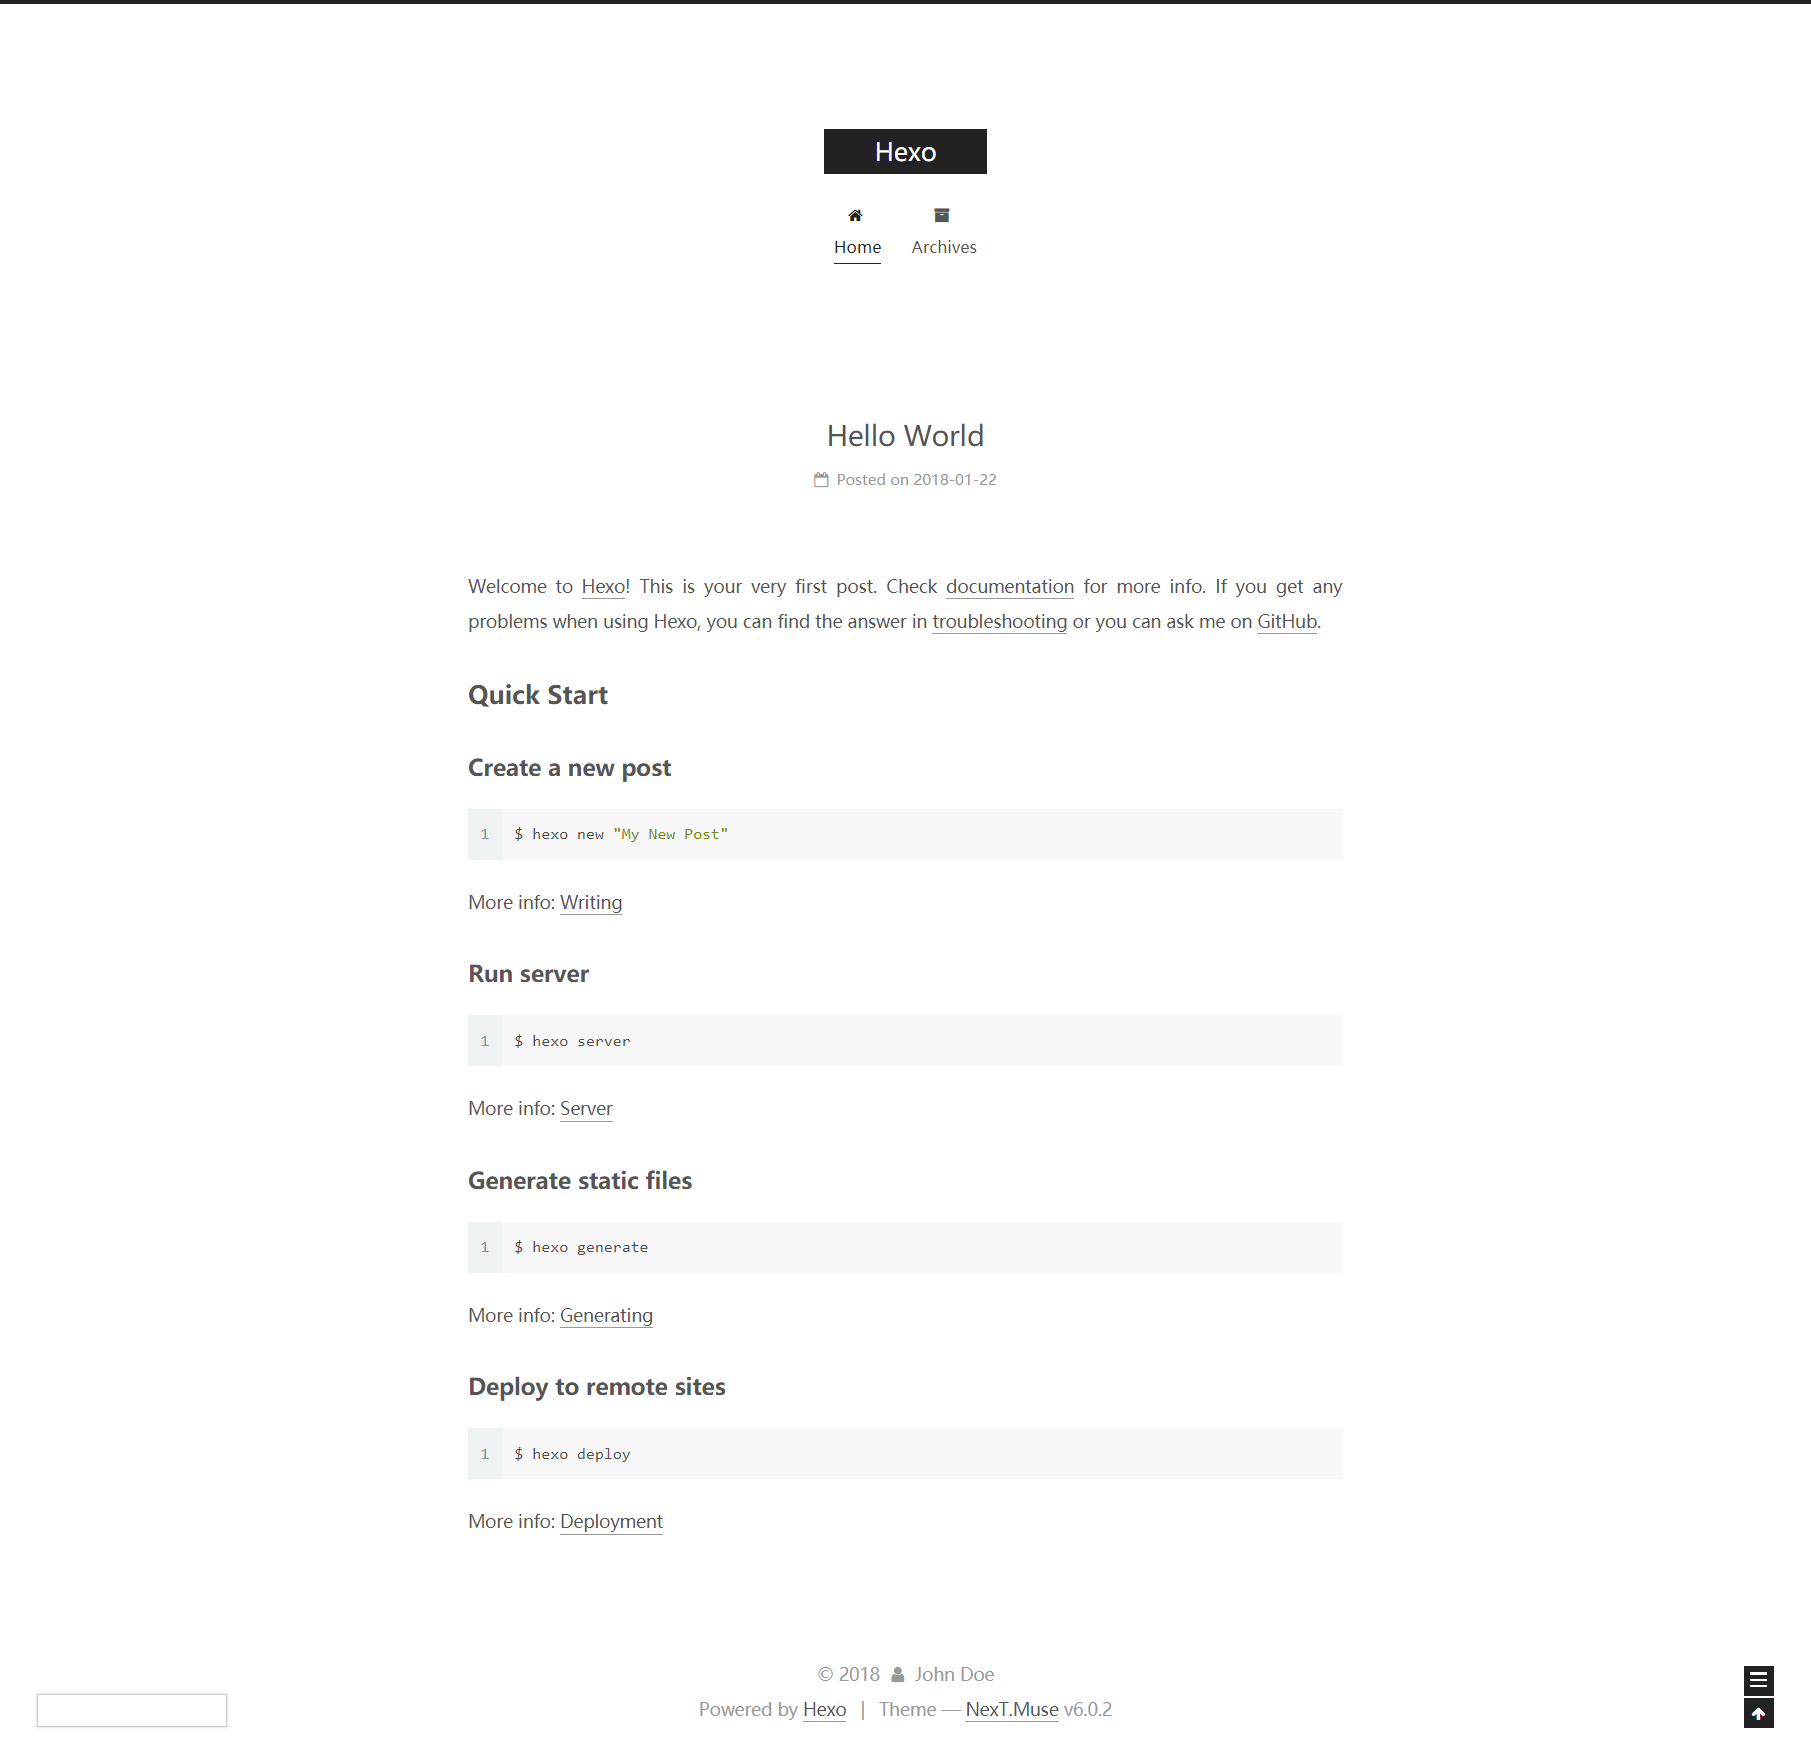
 **恭喜你!你已经完成了博客搭建的主要工作!接下来就是细节的配置了。请耐心阅读以下内容。**

配置

网站脚注

1
2
3
4
5
6
7
8
9
10
11
12
13
14
15
16
17
18
19
20
21
22
footer:
#建站时间
since: 2018
#作者头像并且是动画效果
icon:
name: user
animated: true
color: "##66CDAA"
#显示版权作者
copyright: aigisss 爱即是诗
#不显示Hexo
powered:
enable: false
version: false
#不显示主题和版本
theme:
enable: false
version: false
#显示备案号
beian:
enable: true
icp: 赣ICP备18013338-1号

版权声明

1
2
3
4
creative_commons:
license: by-nc-sa
sidebar: false
post: true

代码块

1
2
3
4
5
6
7
8
9
codeblock:
# 自定义边框半径,默认是1
# 值越大弧度越大
border_radius: 6
# 右上角显示复制按钮
copy_button:
enable: true
# 显示复制结果
show_result: true

分享

1
2
3
4
5
6
7
8
9
10
11
12
13
14
15
16
17
18
needmoreshare2:
enable: true
postbottom:
#文章底部
enable: false
options:
iconStyle: box
boxForm: horizontal
position: bottomCenter
networks: Weibo,Wechat,Douban,QQZone,Twitter,Facebook
#左下角悬浮按钮
float:
enable: true
options:
iconStyle: box
boxForm: horizontal
position: middleRight
networks: Weibo,Wechat,Douban,QQZone,Twitter,Facebook

访问次数

1
2
3
4
5
6
7
8
9
10
11
12
# busuanzi统计
busuanzi_count:
enable: true
# 总访客数
total_visitors: true
total_visitors_icon: user
# 总浏览量
total_views: true
total_views_icon: eye
# 文章浏览量
post_views: true
post_views_icon: eye

顶部阅读进度条

1
2
3
4
reading_progress:
enable: true
color: "#37c6c0"
height: 2px

加载动画

1
2
3
4
5
6
7
8
9
10
11
12
13
14
15
16
17
18
19
20
21
22
23
24
motion:
# 启用
enable: true
# 异步加载
async: true
transition:
# Transition variants:
# fadeIn | fadeOut | flipXIn | flipXOut | flipYIn | flipYOut | flipBounceXIn | flipBounceXOut | flipBounceYIn | flipBounceYOut
# swoopIn | swoopOut | whirlIn | whirlOut | shrinkIn | shrinkOut | expandIn | expandOut
# bounceIn | bounceOut | bounceUpIn | bounceUpOut | bounceDownIn | bounceDownOut | bounceLeftIn | bounceLeftOut | bounceRightIn | bounceRightOut
# slideUpIn | slideUpOut | slideDownIn | slideDownOut | slideLeftIn | slideLeftOut | slideRightIn | slideRightOut
# slideUpBigIn | slideUpBigOut | slideDownBigIn | slideDownBigOut | slideLeftBigIn | slideLeftBigOut | slideRightBigIn | slideRightBigOut
# perspectiveUpIn | perspectiveUpOut | perspectiveDownIn | perspectiveDownOut | perspectiveLeftIn | perspectiveLeftOut | perspectiveRightIn | perspectiveRightOut
# 文章摘要动画
post_block: bounceIn
# 加载各种页面动画(分类,关于,标签等等)
post_header: fadeIn
# 文章详情动画
post_body: fadeIn
#
coll_header: fadeIn
# Only for Pisces | Gemini.
# 侧边栏(人物头像的那部分)
sidebar: fadeIn

搜索功能

NexT自带提供了两个搜索

  • algolia_search
  • local_search

其实这个local_search已经很好用了,配置algolia_search挺麻烦的,而且搜索功能也用的不多

毕竟有万能的Ctrl + F

1
2
3
4
5
6
7
8
9
local_search:
enable: true
# if auto, trigger search by changing input
# if manual, trigger search by pressing enter key or search button
trigger: auto
# show top n results per article, show all results by setting to -1
top_n_per_article: 1
# unescape html strings to the readable one
unescape: false

添加 RSS 订阅

1
2
3
4
5
6
7
8
9
10
npm install hexo-generator-feed --save

复制代码
# Extensions
plugins:
hexo-generate-feed
feed: # RSS订阅插件
type: atom
path: atom.xml
limit: 0 #0就是代表所有

数学公式

1
2
3
4
5
6
7
8
9
10
11
# Math Equations Render Support
math:
enable: true

# Default(true) will load mathjax/katex script on demand
# That is it only render those page who has 'mathjax: true' in Front Matter.
# If you set it to false, it will load mathjax/katex srcipt EVERY PAGE.
per_page: true

engine: mathjax
#engine: katex

还需要在文章的 Front-matter 里打开 mathjax 开关,比如:

1
2
3
4
5
title: 使用hexo下next主题搭建博客的记录
tags: 日常
abbrlink: 326cb881
date: 2019-09-09 09:58:21
mathjax: true

网上一大堆说会出现语义冲突——-类 Latex 格式书写的数学公式下划线_表示下标,有特殊的含义,如果被强制转换为<em>标签,那么 MathJax 引擎在渲染数学公式的时候就会出错。类似的语义冲突的符号还包括*, {, }, \\等。但是!!

在我试验下没有出现此类问题,只要在主题中打开,md 中申明 mathjax: true 就好了,可能在我使用的next6.7中解决了冲突。比如以下的公式能出来!

1
\Gamma(z) = \int_0^\infty t^{z-1}e^{-t}dt\,.
1
2
3
4
5
6
7
8
$$
P = \frac
{\sum_{i=1}^n (x_i- x)(y_i- y)}
{\displaystyle \left[
\sum_{i=1}^n (x_i-x)^2
\sum_{i=1}^n (y_i-y)^2
\right]^{1/2} }
$$

添加自定义菜单

以新建「相册」菜单为例:在博客目录下的 source 文件夹下新建名为 photo 文件夹,然后在 photo 文件夹下新建一个 index.md 文件,然后在该文件填写:

1
2
3
4
5
---
title: 相册
date: 2018-04-16 22:14:07
type: "photo"
---

然后打开主题配置文件 _config.yml,在 menu 中添加:

1
2
3
4
5
6
7
menu:
home: / || home
archives: /archives || archive
categories: /categories || th
tags: /tags || tags
#添加「相册」菜单
相册: /photo || camera

这里的「相册」是博客中显示的菜单名称,紧跟的 photo 要和前面 index.md 文件的 type 值一致,|| 后面的菜单的图标,图标名称来自于 FontAwesome icon,若没有配置图标,默认会使用问号图标

修改文章底部的那个带#号的标签

修改模板/themes/next/layout/_macro/post.swig,搜索 rel="tag">#,将 # 换成<i class="fa fa-tag"></i>

参考

  1. Hexo+NexT 打造一个炫酷博客
  2. 篇Ⅱ:NexT主题的配置和优化指南

使用Hexo + NexT 快速搭建博客
https://www.gishai.top/blog/posts/eba3f111.html
作者
Hai
发布于
2019年9月7日
更新于
2021年12月4日
许可协议